How To Draw A Maine Coon Cat | Step By Step

Hey there fellow art enthusiast! Have you ever been captivated by the majestic presence of a Maine Coon cat and wished you could capture its charm on paper?
Well, you’re in luck because I’m about to take you on a creative journey where I show you how to draw a Maine Coon cat! Grab your pencils and pens!
To draw a Maine Coon cat, start by sketching the basic outline of its body using light, loose lines. Pay attention to its sturdy build and rectangular shape. Next, add details such as tufted ears, large expressive eyes, and a long bushy tail. Shade in fur using varying pencil pressures for depth. Refine details and add highlights for realism.
I don’t find Maine Coon cat drawings easy, therefore, if you’re like me make sure you take your time. I’ve tried to explain the drawing process as best I can!
How To Draw A Maine Coon Cat Step By Step
To create a captivating Maine Coon cat portrait, start by sketching its distinctive features, like tufted ears and muzzle. Pay attention to details, such as fur strands and hind legs, for great results.
Consider adding a furry texture to enhance realism, and experiment with background colors to complement your piece.
With their majestic appearance, tufted ears, expressive eyes, and luxurious fur, Maine Coons provide an exciting challenge for artists seeking to capture this large cat’s unique charm on paper.
My step-by-step guide will walk you through the process of drawing a Maine Coon cat, from understanding their anatomy to adding intricate details and textures.
Whether you’re a seasoned artist or a beginner looking to improve your skills, learning to draw a Maine Coon cat promises to be a rewarding and enjoyable experience.
Step 1: Gather Your Materials
You will need the following materials for drawing Maine Coon Cats:
Paper
Selecting the right paper is crucial for achieving satisfactory results in your drawing.
Opt for heavyweight paper with a smooth or slightly textured surface, such as drawing paper or Bristol board.
The weight of the paper will prevent it from buckling or tearing under the pressure of repeated erasing and shading.
Pencils
A range of graphite pencils in varying degrees of hardness (e.g., 2H, HB, 2B, 4B, 6B) is essential for achieving different tones and textures in your drawing.
Harder pencils (e.g., 2H) produce lighter lines suitable for sketching outlines and fine details, while softer pencils (e.g., 4B, 6B) create darker tones and shading.
Erasers
Invest in high-quality erasers, including a kneaded eraser for lifting graphite and charcoal, and a precision eraser for fine details and corrections.
Erasers are indispensable tools for refining your drawing and correcting mistakes without damaging the paper’s surface.
Blending Tools
Blending tools such as blending stumps, tortillons, or even tissue paper can be used to soften harsh lines and create smooth transitions between different tones and textures.
These tools help achieve a more realistic and polished look in your drawing.
Reference Images
Reference images of Maine Coon cats are essential for accurately capturing their unique features and characteristics.
Choose high-resolution images that showcase different angles, poses, and expressions of Maine Coon cats to guide your drawing process effectively.
You can find reference images in books, online galleries, or by observing Maine Coon cats in real life.
Importance Of Using Good-Quality Materials
Using good-quality materials is paramount to achieving better results in your drawing of Maine Coon cats. Here’s why:
Precision and Control
High-quality pencils and erasers offer better precision and control over your drawing, allowing you to create fine lines, intricate details, and subtle shading with ease.
Durability And Longevity
Good-quality paper withstands erasing, blending, and layering without deteriorating or becoming damaged.
This ensures that your drawing remains intact and retains its quality over time.
Realism And Depth
Superior materials enable you to achieve a wider range of tones, textures, and effects in your drawing, resulting in a more realistic and visually appealing depiction of Maine Coon cats.
Confidence and Satisfaction
Working with good-quality materials instills confidence in your ability.
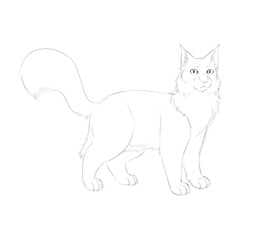
Step 2: Anatomy Of A Maine Coon Cat
Below is an overview of the anatomy of a Maine Coon Cat:
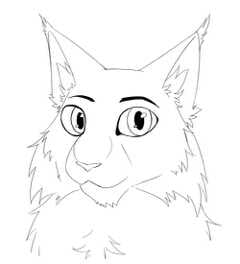
- Head Shape: Maine Coon cats have a distinctive head shape characterized by a square muzzle and prominent cheekbones.
- Ears: Maine Coon cat’s ears are large and tufted, wide at the base and taper to a pointed tip. The strands of fur (tufts of fur) on the tips of the ears are a notable feature of the breed and should be included in drawings for accuracy.
- Eyes: Maine Coon cats have large, expressive eyes that are slightly oval-shaped. Eye colors can vary but commonly include shades of gold, green, or amber.
- Body Structure: Maine Coon cats are one of the largest domestic cat breeds, with a muscular and well-proportioned body. They have a rectangular body shape, with a broad chest and sturdy legs.
- Tail: The tail of a Maine Coon cat is long, bushy, and tapering to a point.
- Skull: The skull is slightly longer than it is wide, with a gentle slope from the forehead to the nose.
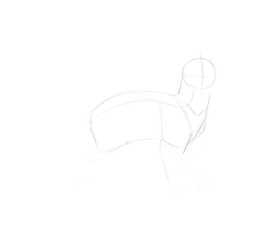
Step 3: Draw The Head And Line Of Action

If you want to learn how to draw a realistic cat, start by sketching the basic outline of a Maine Coon cat, using light loose lines.
Begin with a line of action and a circle for the head. The line should follow the curve of the cat’s spine.
You can add guidelines to the head to show the direction the cat is looking.
Step 4: Draw The Bean Shape
The “bean shape” refers to the basic body shape of the cat you are drawing.
When learning how to draw a Maine Coon cat, one important thing to keep in mind is its rectangular body shape.
Once you have drawn the main body, it is time to add the shoulders, and then the neck. I found drawing cat shoulders one of the most difficult parts of drawing a cat!
To help you draw the cat’s shoulders, think of a cat’s “chest” as a V-shape or heart shape. The shoulders meet just at the base of a cat’s neck.
The scapula curves forward, and then the upper front legs curve back as the scapula meets the humerus.
The neck is much simpler than the shoulders and upper front legs; you can simply attach the head to the shoulders in two lines.
Step 5: Draw The Legs
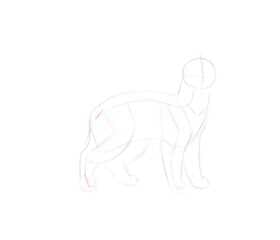
Draw the cat’s legs, which are quite thick and muscular.
For the back legs, there are five major parts to consider:
- Pelvis: The pelvis curves down at the end of the spine.
- Femur: The femur juts forward to meet the fibula and tibia.
- The fibula and tibia are the longest bones of the back legs.
- The “heel” of a cat’s back leg is its tarsals.
- Draw the cat’s back paws.
Step 6: Add Final Sketch Details
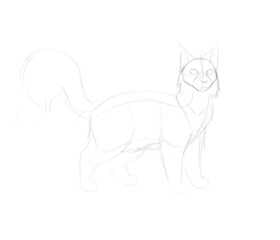
To finish off the sketch, add details like the tail and the body of the fur. Now you can add the eyes, muzzle, and ears as well.
Step 7: Line Art
Finally, draw a Maine Coon cat step-by-step by adding line art.
You can do this by drawing over your sketch with pens or markers, or you can add a new layer and draw in a darker, thicker line if you are drawing digitally.
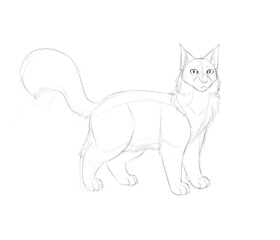
Step 8: Remove Sketch
To polish your drawing, either erase the sketch you drew (if you are drawing traditionally) or hide the sketch layer (if you are drawing digitally).
You can finalize the lineart if you wish by cleaning up some of the details and adding a bit of line weight to show depth and shadow.
Step 9: Final Touches
Once you are happy with your picture, it’s time to make the final touches to your drawing of a Maine Coon cat.
I recommend you do the following at this stage:
Add Highlights To the fur
- Use a white or light-colored pencil or eraser to add highlights to the fur, particularly in areas where the light hits the cat’s coat.
- Lightly apply strokes or dots to create the illusion of shiny or reflective fur.
- Focus on areas like the tips of the fur tufts, the bridge of the cat’s nose, and the top of the head where light would naturally catch.
Adust the contract
- Review the contrast in your drawing to ensure that it has depth and dimension.
- Darken shadows and deepen tones in areas of shadow to create contrast with lighter areas.
- Use a blending tool or pencil to smooth transitions between different tones and textures, ensuring a seamless and cohesive appearance.
Clean Up smudges and stray lines
- Inspect your drawing for any smudges, fingerprints, or stray lines.
- Use a clean eraser to gently remove any unwanted marks or smudges.
- Take your time to clean up the drawing meticulously, paying attention to detail and ensuring a polished finish.
Drawing Tips
Whilst drawing any picture, always consider the following:
- Gain Perspective
- Rest Your Eyes And Mind
- Be Objective
- Monitor Quality
Let’s look at these different factors in closer detail:
Perspective
Taking breaks allows you to step back from your drawing and gain a fresh perspective.
Distance helps you assess the drawing as a whole, identify areas that need improvement, and make informed decisions about final adjustments.
Rest Your Eyes And Mind
Drawing for extended periods can strain your eyes and fatigue your mind.
Take breaks to give your eyes a chance to rest and help prevent:
- Eye Strain
- Headaches
- Fatigue
Breaks in drawing enable the mind to recharge, fostering creativity and focus.
Be Objective
Take a step back from your drawing so you can view your picture with a more objective eye.
Evaluate your progress, identify areas of strength and weakness, and make necessary corrections without becoming overly attached to specific details.
Monitor Quality
Having regular rests will help maintain the quality and integrity of your drawing.
By taking the time to rest and assess your work, you can ensure that final touches are applied thoughtfully and accurately, resulting in a high-quality finished piece.
How To Draw A Cartoon Version Of A Maine Coon
If you would like to draw a cartoon Maine Coon cat, most of the stylization occurs in the face. Begin by drawing the basic shape of the head and neck.

Next, include the rough outline of the:
- Cheekbones
- Muzzle
- Jaw
- Browbones
When drawing a cartoon cat, add eyebrows to the cat as this adds human-like expressiveness. You should also make the cat’s eyes bigger!

Once you have your sketch finished, polish it up with a lineart.

Conclusion
Mastering the art of drawing a Maine Coon cat is not merely about replicating its physical form, but capturing its essence.
For instance, the regal demeanor, expressive eyes, and luxurious fur define this majestic cat breed.
Through careful observation, practice, and attention to detail, artists can bring Maine Coon cats to life on paper, celebrating their beauty and charm in a tangible form.
Remember, drawing is a journey of discovery and growth, and each stroke of the pencil is an opportunity to refine your skills and deepen your connection with these magnificent creatures.
So, whether you’re a novice artist seeking to improve your craft or an experienced illustrator looking for a new challenge, drawing a Maine Coon cat offers endless possibilities for creativity and expression.
Let your imagination soar and your pencils dance as you embark on this captivating artistic endeavor.